
Latest posts by StartupWebTraining (see all)
- Video background to website homepage using Elementor - October 25, 2019
- Vantage Theme with Site Origins Page Builder – An example Site with Instructions - April 2, 2019
- WordPress Block Editor - March 4, 2019
I like the Site Origin page builder. It works very nicely with VANTAGE a cool theme by Site Origin. I created an example website for a fictitious Web Design Agency to showcase how the Theme is customised particularly how to create a custom home page.
This is my second post on using Site Origin Page Builder. The other one was entitled how to create a custom 404 Error page. Some of the introductory concepts explained in that post will not be repeated here.

Vantage Theme by Site Origin
Search for Vantage by SiteOrigin to add the Theme to your site via Dashboard >>> Appearance >>> Themes. It has over 8 million downloads according to the promotional video on the documentation site.
Vantage is a flexible multipurpose theme
SiteOrigin Page Builder and SiteOrigin Widgets Bundle
Once installed and activated, a notification appears to inform that the Theme recommends the SiteOrigin Page Builder and SiteOrigin Widgets Bundle. Install these via Dashboard >>> Appearance >>> Plugins. I also downloaded Widgets for SiteOrigin by WPInked.
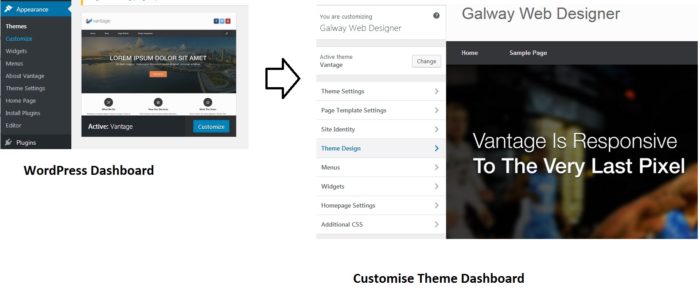
Customising the Vantage Theme
The Customise Dashboard has 8 main settings many of which have sub settings:
- Theme Settings – with 8 sub settings
- Page Template Settings – with 3 sub settings
- Site Identity
- Theme Design – with 9
sub items - Menus
- Widgets – 4 areas to display widgets
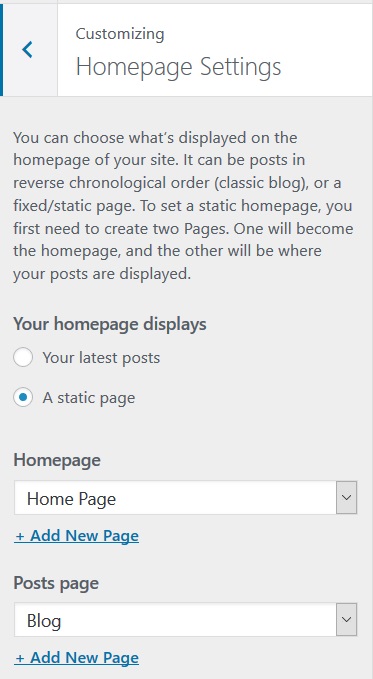
- Homepage Settings – to select Posts or a Static Page
- Additional CSS
You just need to figure out what each setting does. There are a huge amount of options.
Starting Point is a Website Plan
The starting point with creating a website is a Website Plan. Your website demands Content. Before creating my example website. I always suggest looking at other websites to draw inspiration –
Number of Menu Items
Our example site’s Navigation Menu will contain 5 main items
- About Us
- What we do
- Our Work
- Blog
- Contact Us
Each of these requires a page to be created and will need a plan as to the information to be included on each page. Looking at typical web design agencies, one would expect the Services or What we Do to feature the following:
- Logo design
- Promotional Website Design
- eCommerce Websites
- Search Engine Optimisation (SEO)
- Website Hosting, Domains & Security
They may also offer Social Media management. Each of the services will have its own page which will be a sub menu item of the page ‘What we do’. So I went ahead and created the aforementioned 10 pages. Within Vantage there is an option to have a Custom home page which is created using Site Origin page builder – we will do this. In Vantage clicking on the logo in Navigation Header will bring the visitor to the home page.
Turn on Custom Home Page
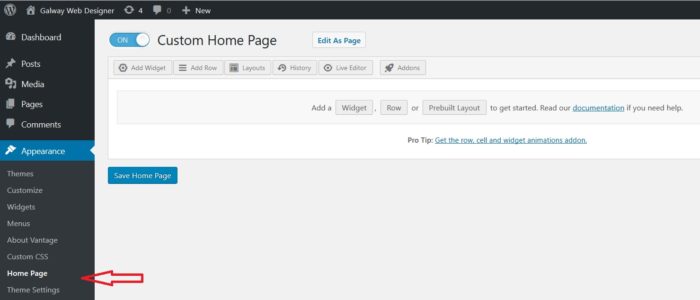
To activate custom Home page, go to WordPress Dashboard >>> Appearance >>> Home Page … if you want to edit the home page at any time you can go directly to the page via Appearance and Home Page.
To set Blog page
Go to the Customise Theme Dashboard to find the setting that controls which page is designated as your Blog page – the page which displays all blog posts in chronological order. Go to APPEARANCE >>> CUSTOMISE >>> Homepage Settings to confirm what you want a Static Page and select Homepage and then select which page is to be your Blog posts page.
Add Navigation Menu
The
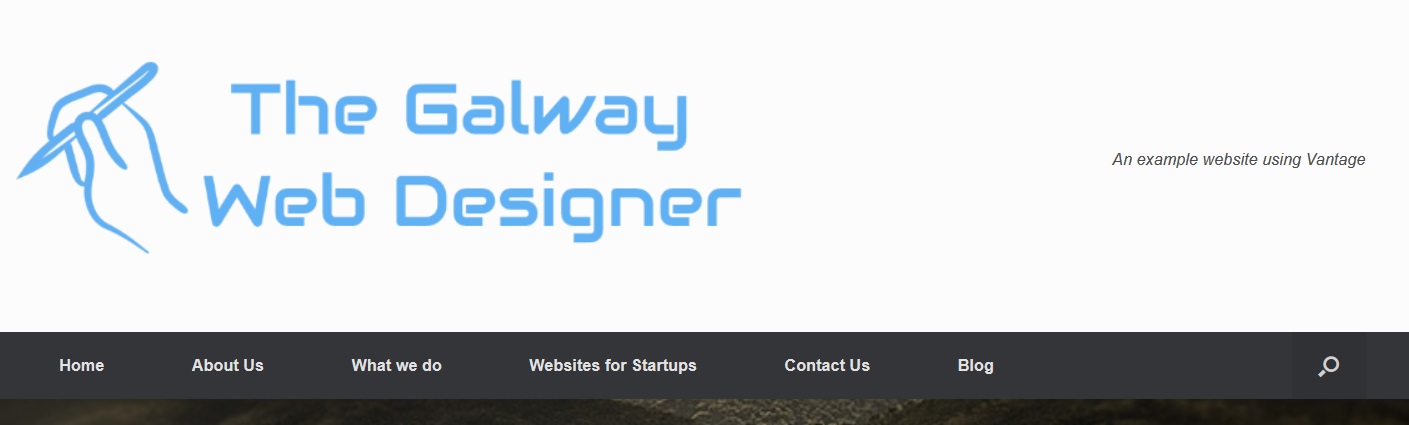
In version 1 above I have added a logo to the site via APPEARANCE >>> CUSTOMISE >>> THEME SETTINGS and >>> LOGO. I selected to not crop the image for the logo which I created using a free online logo maker. This is also where you can edit the Header Text which is Call Me, Maybe? text which I have changed to ‘An Example Website using Vantage’
Logo in Menu in Masthead
Version 2 of the Navigation Menu places the Logo into the Menu directly into the menu. The setting is found via APPEARANCE >>> CUSTOMISE >>> THEME SETTINGS and >>> LAYOUT. It can be further customised in Settings particularly changing the colour scheme of the header and footer sectioins as per version 3 below. The text size within the Menu can also be changed (here it is increased to 16)
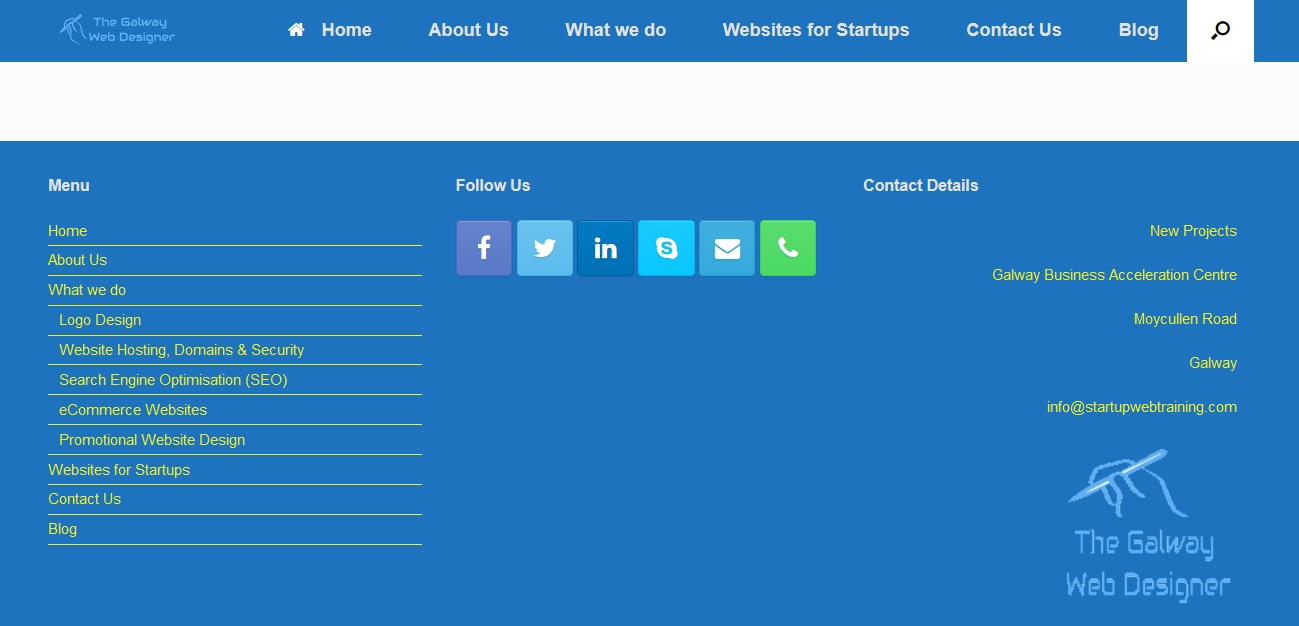
The image in version 3 above shows that the Footer has been added using 3 Site Origin widgets, namely a Menu Widget, Social Media and Rich Text Editor. The next change was to add a Background image accomplished via Appearance >>>> Background … which opens up the Customise menu for Background. I generally pick an image that will fill the screen when placed in the centre. In the final version of the website, I changed the logo and I changed the colours of the Navigation menu and footer to match those of a cool background image that was added. I also changed the layout to Boxed so that the background image would be shown via APPEARANCE >>> CUSTOMISE >>> THEME SETTINGS and >>> LAYOUT.
To include Search in the Navigation Menu select that option in Navigation via >> Theme Settings >>> Appearance >>> CUSTOMISE >>> THEME SETTINGs >>> NAVIGATION. You can customise the Search Icon in ICONS in THEME SETTINGS by adding your own image (but not sure what image would be better than the default search icon).
The majority of images used on the website are sourced from royalty free image site Pixabay.com
Creating the Logo
The logos were created very simply using a free online site called Logomakr.com There is a
Customise the Home Page
I will now describe how the homepage was created.
I. Create/Add a Smart Slider 3
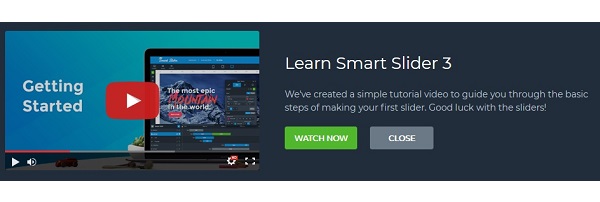
Smart Slider 3 integrates nicely with Vantage. Download the plugin and create a slider. Have a read of my blogpost on how to use Smart Slider 3. For the slider i just wanted 2 slides. I added a Heading, Text and a Button to each slider. I intentionally blurred the image on slide 2. Please note that earlier i had deactivated the slider from the theme to show the Logo Header masthead and the footer. To reactivate >>> Appearance >>> CUSTOMISE >>> THEME SETTINGs >>> HOME … from here you can select the slider that you wish to feature on the homepage.
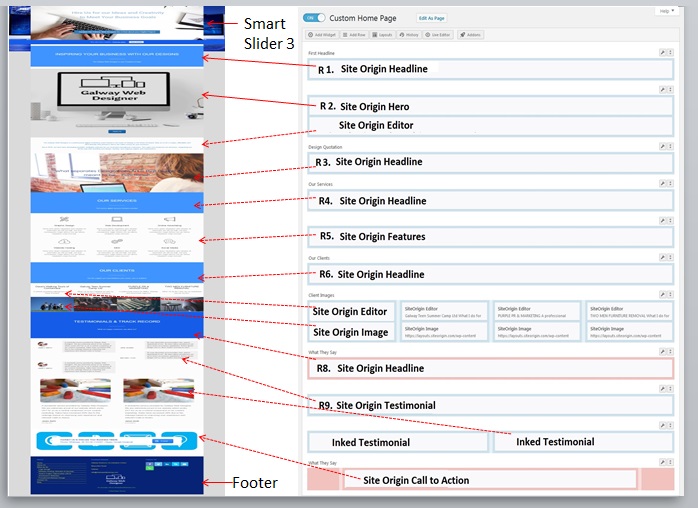
II. Home Page involves tweaking a Standard Layout provided by SiteOrigin
The home page is made up of 11 Rows. There are then 20 separate Widget areas used across the 11 rows.
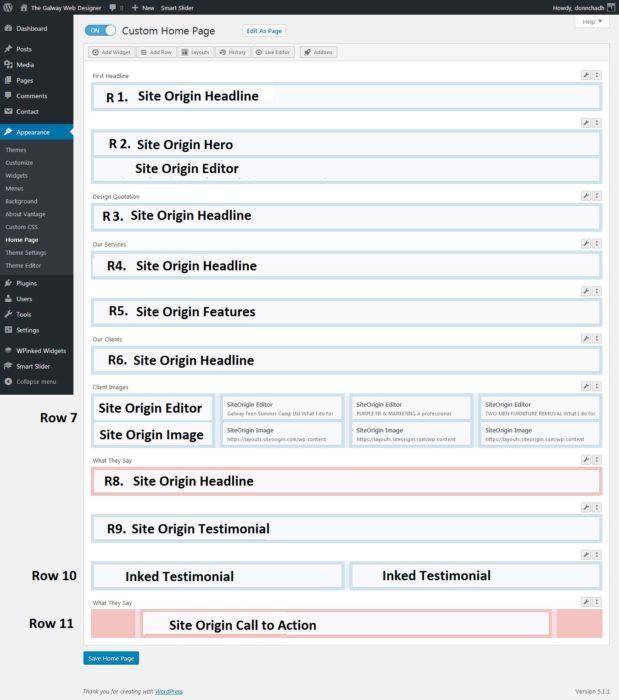
- Row 1 is a Site Origin Headline that reads ‘Inspiring your Business with our Designs’. This is the headline and the sub-headline is ‘The Galway Web Designer is your Freelance Expert’. There is a line divider between those – which could be moved to bottom removed or the colour and thickness could be changed.
This headline widget is directly under the Smart Slider 3 which
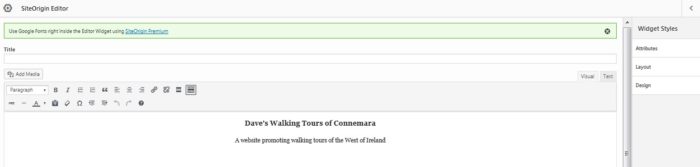
- Row 2 has two widgets. On top is a SiteOrigin Hero and underneath is a SiteOrigin Editor. The SiteOrigin Editor has the ‘about us’ text while the SiteOrigin Hero is used to add the Image of the screen on the desk.
The SiteOrigin Hero widget is fantastic. Here we have only Frame. Two makes a slider. So the image is set as the Background and the Content has no text only the [buttons] shortcode.
BIG TIP: The easiest way to get this effect for your website is to use a Pre Built Layout within the Site Origin Page Builder. You then just have to modify and edit the Text and images. The padding and margin settings need not be changed as these can be tricky.
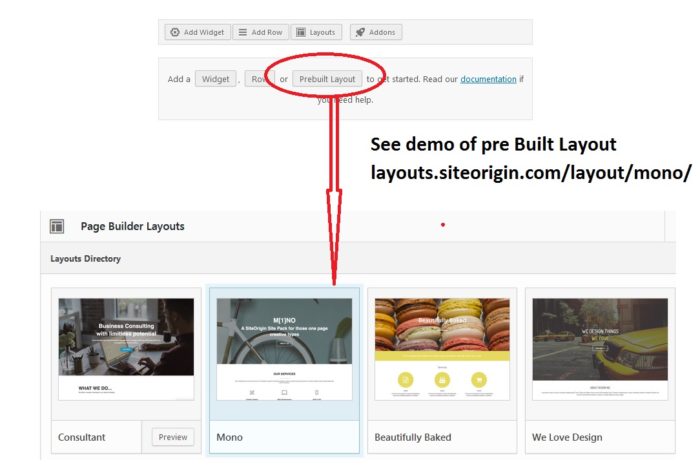
TIP: You can add one Pre Built Layout and then add another one after it making your own custom design. You can add new rows and remove any rows or widgets that you don’t want.
- ROW 3 has another site origin headline widget. The text is added as a subheadline to the widget.
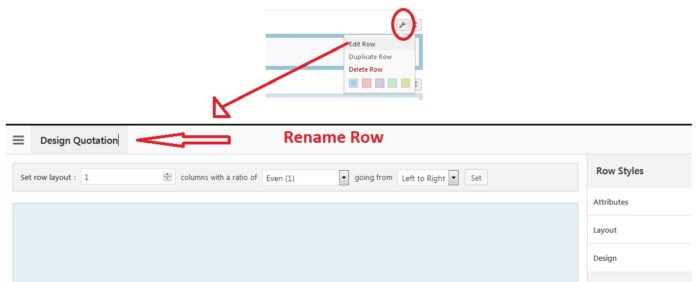
TIP: I have named this row as ‘Design Quotation’ – add a name via Edit Row
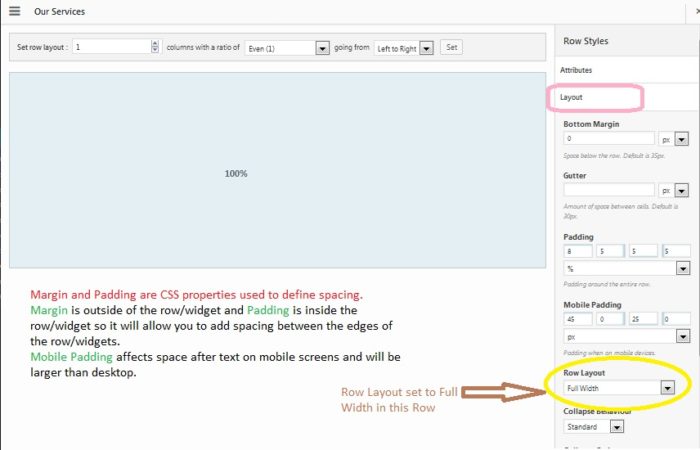
- Row 4 is a Headline Widget with a Headline of Our Services. The background colour of the Entire Row has been changed for consistency with the rest of the page via Row Styles and Design. The margin and padding is set via Row Styles and Layout.
- Row 5 contains a Features Widget copied in via the Pre Built Layout. [The title of this Widget is left blank as it is difficult to format – I added Row 4 so that a nice ‘our services’ heading would be presented]. The features widget has 6 Feature elments not dissimilar to the frames in the Hero Widget, for:Graphic Design, Web Development, Online Advertising, Website Hosting, SEO and Social Media. Each of these link to a page outlining that service as per the menu navigation. It is relatively easy to change the design of the Featured Icons. There is a lot of customisation available.
- Row 6 is a duplicate of Row 4 with
text changed for Headline and Sub-Headline. - Row 7 has 8 widgets in 4 columns. The Row is full width stretched in Layout. In each column, on top is a Site Origin Editor and underneath a SiteOrigin Image. The images scale to fit so don’t need to be resized before uploading. I changed 3 of the original images leaving one from the Pre Built layout. The Site Origin Editor looks like a Title and SubTitle but it is not. The title is left blank as per image below. The advantage is that you can add as much text as you wish to each box. You would need to keep the word count consistent
acorss all 4 columns.
- Row 8 Testimonials is a duplicate of Row 4 and 6 with text changed for Headline and Sub-Headline.
- Row 9 has a Site Origin Testimonial Widget.
- Row 10 has a different Testimonial Widget this one from WPInked.
- Row 11 has 1 column with a Site Origin Call to Action Widget. There is a png image added to the background of the Row. Image Display is Cover to fill the entire row, which is full width (i thought it looked better than full width stretched). The widget dictates the Heading and Sub heading of the Call to action and the button. I did struggle to place the Call to Action correctly within the row using Padding and Margin so eventually I created three columns placing the Call to action in the middle column and leaving the other two blank. The padding was then set at 20px left and right so that the background image could be seen in desktop mode. It is not possible to put a background image into the Call to Action widget directly.
Summary of Page Builder Row Building
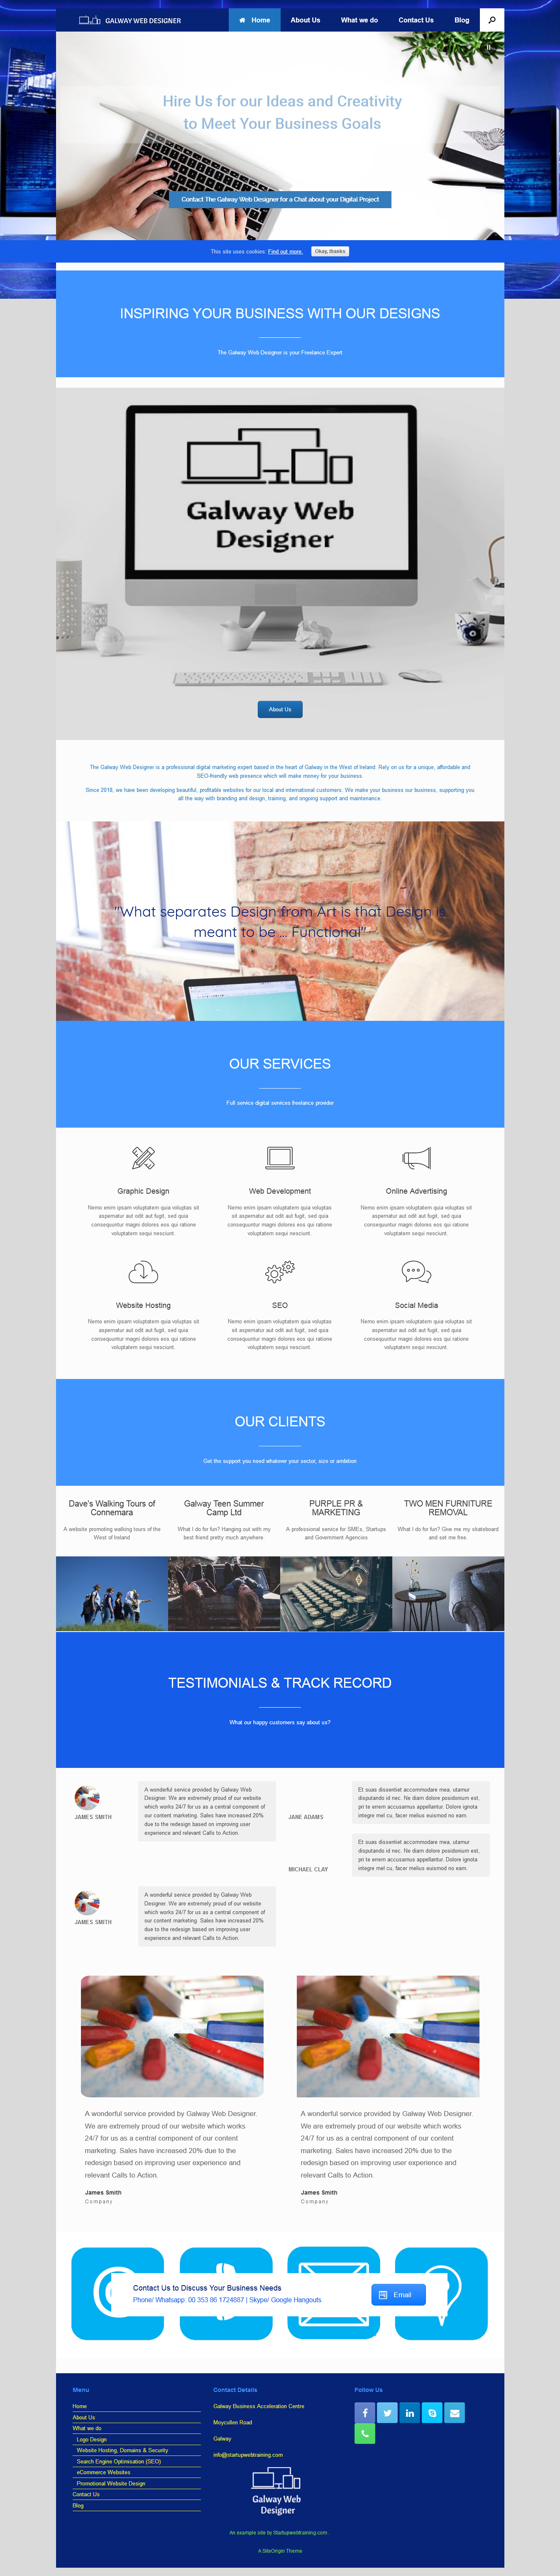
And here is the image which maps each row and widget to the end result on the homepage.
Other Pages – Contact Us
I added a Contact Us Form to the Contact Us Page using
As always i hope you find this long post useful. Comments and social shares welcome.
Best Regards
donnncha
Check out upcoming Training Dates delivered by Donncha Hughes for LEO Galway – SEO and Creating a Business Website using WordPress – book direct via LEO Galway.